this is basically what he wants, by the way. This beauty is from New
Orleans Guitar Company
| Official Luthiers Forum! http://www-.luthiersforum.com/forum/ |
|
| Colored Finish http://www-.luthiersforum.com/forum/viewtopic.php?f=10102&t=9974 |
Page 1 of 1 |
| Author: | SniderMike [ Sat Dec 23, 2006 7:34 am ] |
| Post subject: | |
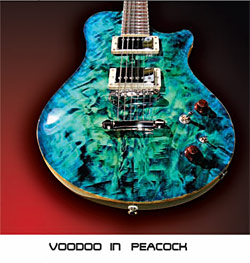
So the latest electric I'm doing is for a friend for the cost of materials. Semi-solid, mahogany back and neck, quilted maple top. Everything is coming along very nicely (although slowly), but of course now he wants a blue-green transparent finish on the maple top. Problem is I've never done any color finishes. I've done many tests on scrap with some good and bad results. I'm using Trans-Tint dyes (blue, green, yellow), with DA. I'm wiping a thin, dark coat first, and sanding back so as to "pop" the grain. Then it seems like spraying on the final dye is the way to go, but I just can't seem to get really consistent results from test scrap to test scrap. Also, I'm keeping the edges natural, so as to look like maple binding, ala PRS, but that seems to go pretty well. I use some lacquer to "tape" off the "binding." Anyway, just wondering if any of you have any tips or advice??? Thanks in advance PS: I pretty sure I'll be going with a two part polyurethane finish on this one |
|
| Author: | Bobc [ Sat Dec 23, 2006 9:02 am ] |
| Post subject: | |
Mike instead of spraying just the dye diluted in alcohol try tinting some sealer or shellac. I use waterborne shellac and it works well. |
|
| Author: | SniderMike [ Sat Dec 23, 2006 11:05 am ] |
| Post subject: | |
I'll give that a try Bob, thanks. I've never heard of a waterborne shellac though. Hafta look into that. Thanks again. |
|
| Author: | SniderMike [ Sat Dec 23, 2006 3:34 pm ] |
| Post subject: | |
this is basically what he wants, by the way. This beauty is from New Orleans Guitar Company
|
|
| Author: | kdguitars [ Sat Dec 23, 2006 4:55 pm ] |
| Post subject: | |
Mike, I am a fairly new guy at this too but how I would do the electric is to first tape of the "binding" with some pinstriping tape you can get from an auto paint store. Then wipe a yellow stain with the alcohol. Although you might find a different color but I have seen a green mandolin done this way. check out ludewigmandolins.com I did a flame maple top with a tobacco burst. There is a pic on kdguitars.com if you want to check it out. The site is still under major renovation so there might not be the shot you are looking for. After the yellow alcohol stain. I would seal it with whatever you are using. For me it was a coat of nitro. That way I could come back to that point if I didn't like it. then I would thin my color coats and put them on with light coats and control the amount of color. Remember that the clear coats that you put on top will deepen the result. After this coat of color I peeled the tape and put 5 more coats of clear laquer concentrating on the edges for the binding. I hope this helps. I am beginning to use 2 part also and trying to figure out when to add color. Let me know if this helps. Karl |
|
| Author: | Bobc [ Sat Dec 23, 2006 11:54 pm ] |
| Post subject: | |
Target Coatings makes it. http://www.targetcoatings.com/ |
|
| Author: | SniderMike [ Sun Dec 24, 2006 6:26 am ] |
| Post subject: | |
Thanks for the link Bob. I'd like to try the other Target products as well someday soon. Karl, thanks for your insight. I find that when I use tape the dye just seaps under, however. The lacquer around the edge really works well though. I have been applying with a small brush. Just scrap off when done with the color. I will do some tests with the color in the actual finish (or sealer) though, as you and Bob suggest. |
|
| Author: | Mattia Valente [ Tue Dec 26, 2006 9:40 am ] |
| Post subject: | |
What I do: mask everything but the 'faux' binding edge. Then seal that with 3-4 coats of shellac, nitro, whatever. Then unmask, apply your stains (I'd go with a dark blue base, sanded back, then a pale aqua - try diluting with water, whether you use DA or water is irellevant in terms of what you can topcoat with; I'd play with blue and yellow, mostly). That finish looks like it's a direct stain job, rather than tinted lacquer (the results look different; direct stain is more 'dramatic', but you lose a little bit of the 3D chatoyance of the wood), although I'd probably do a combined approach: Stain the whole top (minus binding, pre-sealed), dark blue, then sand back, then stain the greenish/aqua colour in the middle, then shoot tinted pale blue in a burst around the edges. Alternately, if you dilute in water you should be able to 'blend' the stains directly on the wood, like aquarelles; look at some of David Myka's work (google Myka Guitars) for some prime examples of direct stained finishes, water-based dyes, under nitro. |
|
| Author: | SniderMike [ Tue Dec 26, 2006 1:33 pm ] |
| Post subject: | |
Mattia, thanks so much. I'm going to try to do some more "testing" tomorrow. When you say you'd probably do a "combined approach," do you mean do the direct staining and then tint the first couple coats of finish as well? Oh, and thanks for the David Myka link. He definitely has some sweeeeet lookin' guitars! |
|
| Author: | Mattia Valente [ Tue Dec 26, 2006 8:57 pm ] |
| Post subject: | |
[QUOTE=SniderMike] Mattia, thanks so much. I'm going to try to do some more "testing" tomorrow. When you say you'd probably do a "combined approach," do you mean do the direct staining and then tint the first couple coats of finish as well? Oh, and thanks for the David Myka link. He definitely has some sweeeeet lookin' guitars! [/QUOTE] Yes, tinted for fine-tuning the burst, direct stain for the strong 'pop'. Mostly because that's what I've done on my own guitars to date, because I'm a bit chicken about direct staining and blending colours. David's encouraged me to do some proper trial runs, though, so I will give it a shot in future! You might want to check out some of David Myka's tutorials/how to threads at projectguitar.com (go to the forums, I think it's in the finishing tutorials section, pinned up top), which have some nice photo documentation as well. This guitar I made with a black sandback, and a red-tinted lacquer over the top. Nowhere near as wild (colour-wise) as the above example, but still. Also has masked, sealed, 'fake' binding on the edge, as described above: 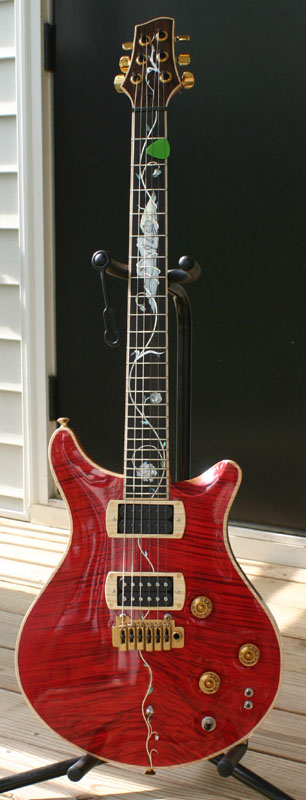
EDIT: I keep forgetting to add this bit: use pinstripe tape to mask off the sealed fake binding area when you start staining and shooting colour coats. Almost goes without saying, but better said than not! |
|
| Author: | SniderMike [ Wed Dec 27, 2006 2:57 am ] |
| Post subject: | |
Mattia, thanks again. your guitar there is beautiful! I'd love to see a closeup of that inlay too. I've got another question for you: Once you've sealed and taped off the binding, and then you've applied the first "dark" coat of dye, do you remove the tape for sanding back that first coat, or just sand carefully right up to it? I've been re-sealing after sanding in my test runs, but it'd be nice to have to. |
|
| Author: | Mattia Valente [ Wed Dec 27, 2006 4:48 am ] |
| Post subject: | |
Thanks! Closeups in this directory (pat_finished files jpg's), so knock yourself out: http://www.xs4all.nl/~mvalente/guitarpics4/ Once I've sealed the top, I pinstripe mask the entire faux binding, then sand carefully. I unmask/remove the tape and clean up with a single edged razor blade when I'm done staining, then re-mask, shoot any tinted coats, unmask, clean up again, shoot clears. Not sure that's all that much less work, and as said, I haven't done massively complex multi-stain direct stain jobs. |
|
| Author: | SniderMike [ Wed Dec 27, 2006 3:58 pm ] |
| Post subject: | |
Very nice job on the inlay, Mattia. The whole guitar looks great. You do very nice work. |
|
| Author: | Mattia Valente [ Thu Dec 28, 2006 11:00 am ] |
| Post subject: | |
Thanks! That guitar had quite a few firsts for me, including the faux binding, the scope of the inlay, and the first engraving I've ever done. Made a good friend and husband-to-be very happy, ergo it made me very happy too. |
|
| Author: | SniderMike [ Sat Dec 30, 2006 8:48 am ] |
| Post subject: | |
Very cool Mattia. I definitely know the feeling of diving into engraving for the first time too. Yours really does look great though. Anyway, I think I'm getting pretty comfortable with the coloring. Here's some scrap, if anyone is interested: 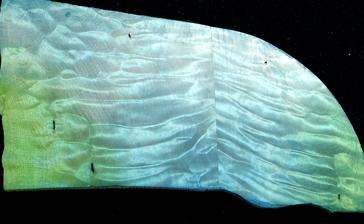
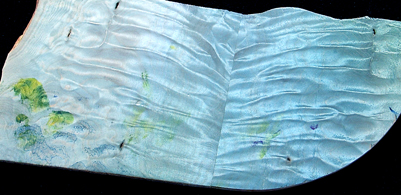
Thanks for everyone's help. |
|
| Author: | russ [ Sun Dec 31, 2006 6:55 pm ] |
| Post subject: | |
Mike, Here is another link (from Stew Mac) that might help you a little, although it only describes a single color stain. |
|
| Author: | SniderMike [ Tue Jan 02, 2007 2:57 am ] |
| Post subject: | |
Thanks Russ! Seems like there's some good tips in there. |
|
| Page 1 of 1 | All times are UTC - 5 hours |
| Powered by phpBB® Forum Software © phpBB Group http://www.phpbb.com/ |
|